Translation

Showing posts with label Adobe Illustrator. Show all posts

27.10.10

Create a Feather Brush and Set of Detailed Wings in Illustrator

In this tutorial I’m going to show you how to create a feather art brush. You’ll then learn how to use it to create a set of angel wings, which can be added to your illustrations.


Introduction

It’s a common element in fantasy style art to have a set of wings. Ranging from bird like wings to epic angel wings, they can communicate a sense of freedom. Let’s learn to create a feather art brush, then use it to create a set of angel wings, which would work great in your next fantasy, vector illustration.

Step 1

Create a new Art Brush by creating a slim black triangle with the Pen Tool (P), and then drag and dropping it into your Brush Palette. Select New Art Brush, change the Colorization Method to Tints, and click on OK.

Step 2

Using the Free Transform Tool (E) rotate the triangle 90 degrees so the flat base is at the bottom. Change the fill color to a medium gray (C=0, M=0, Y=0, K=30).
Copy (Command + C) and Paste in Front (Command + F) the triangle. Using the Direct Selection Tool (A), move one of the points in the base of the triangle and change the fill color to a light gray (C=0, M=0, Y=0, K=10).
Repeat this process while creating a darker triangle on the other side of the shape with a darker gray (C=0, M=0, Y=0, K=60). Once you have the three shapes, Select All (Command + A) and Group them (Command + G).

Step 3

The next step you’re going to need to Draw Behind. You can either click on the circled button below on the toolbar or hit Shift + D on your keyboard. While selected any future strokes and shapes will be drawn behind the previously drawn object.
Using the Paintbrush Tool (B), select your triangle brush and set it to 0.25pt stroke weight and set the stroke color to medium gray (C=0, M=0, Y=0, K=30).
Imagine the three tone triangle as the spine to the feather. To help make it easier to draw the strands of the feather, draw the bottom of the feather just above the bottom of the spine. Repeat the same strands towards the top, however not placing them at the very top. Then to assist further, draw some strands in the middle.

Step 4

Using the same stroke settings, draw in further strands between your guides. Don’t worry if they are not completely uniform as it will look more organic if there are some strands which are close to each other or even cross over.

Step 5

Back to the Pen Tool (P), change the stroke color to null and the fill color to light gray (C=0, M=0, Y=0, K=10). Starting from the bottom strands of the feather, draw around the strands, connecting as many as you can to create a background to the strands.

Step 6

While the background to the feather shape is selected, go into the Appearance panel. Set the stroke as 2pt and align to outside of the shape. Change the Opacity to 10% and the Blending Mode to Multiply.

Step 7

Copy (Command + C) and Paste in Front (Command + F) the feather shape and remove the stroke appearance from it. Using the Rectangle Tool (M), cover half of the feather where your highlight line on the stem is at. Drag the shape above the copied feather shape.
Minus Front using the Pathfinder options, while the rectangle and feather shape are selected. Then change the fill color of this portion to a dark gray other than what you had, but not too dark that you can’t see the strands you previously drew (C=0, M=0, Y=0, K=20).

Step 8

Change the drawing mode to Draw Normal by selecting the button on the toolbar or hitting Shift + D on your keyboard. This will mean any new strokes will be drawn on top of each other.
Set the Paintbrush Tool (B) with your triangle brush to: stroke weight 1pt, stroke color of a light gray (C=0, M=0, Y=0, K=20). Now change the Blending Mode to Screen and the Opacity to 50%. Draw strokes on the lighter side of the feather. Double over some of the strokes to give more highlights and subtle variation in the tone.

Step 9

Change the Blending Mode now to Multiply and Opacity to 35%. Draw strands on the darker side of the feather as before.

Step 10

Select one of the strands you’ve just created and go to Select > Same > Stroke Weight and then Group the strands (Command + G).
Drag the newly created group below the group you made for the spine of the feather.

Step 11

Select all (Command + A) and then Group (Command + G) all the elements together. Drag and drop the group into the Brush palette and select New Art Brush.
Due to the size of the brush created, I’ve changed mine to 30% of the original size. Change the direction of the brush so the start of your stroke is the base of the feather and the tip is the last point of your stroke. Now change the Colorization Method to Tints and click OK.

Feather Brush Conclusion

Your brush is now complete and can be altered to give tints of color and to increase the contrast of the brush depending on how dark your colors are.

Creating a Set of Wings

Now that you’ve created your detailed feather art brush, you can use it to construct a variety of stylized wings. I’m going to show you simple way to create a set of stunning wings.

Step 1

The general rule with constructing wings is to work in layers of feathers. The feathers on the top of the wing will be finer and shorter… the lower layers will be wider and longer. So working on this theory I’m going to construct this set of wings shown below.
For each of the layers of feathers I have Grouped them (Command + G) to make it easier to work with later on.
I’m using the stroke color for my feathers of a gray with a hint of blue (C=55, M=45, Y=30, K=0).
Tip: Place a color behind your wings so you can make sure you have no gaps between the top parts of the wing.

Step 2

To give each layer of feathers more definition, add a transparent linear gradient black to black set to Multiply under each one.

Step 3

Lock the gradients, then using the Direct Selection Tool (A), click on some random feathers and alter their color subtly. I recommend lightening the feathers towards the top slightly, therefore the lower feathers would be altered to look a little darker.

Step 4

Unlock the gradients and then Select All (Command + A). Then Copy (Command + C) and Paste (Command + V).
Now reflect the wings by going to Object > Transform > Reflect, select Vertical, and click on OK.

Step 5

In the Brush palette, drag and drop the feather brush onto the New Brush icon. This will duplicate the brush. Then double-click on your copied feather, tick the box Flip Across, and then click on OK.

Step 6

Select the groups from the mirrored wing and apply the copied feather brush. Now with the Direct Selection Tool (A), select individual feathers and alter their placement, length, and angle so they don’t look mirrored.

Conclusion

Thanks to the time spent on creating your feather brush, you can create a variety of wings in no time at all. If you’d like to learn more about the structure of a wing, I highly recommend this Wing Tutorial via Fatal-Mantis85. The final wings are shown below.


8.10.10

create a simple trash

preview

Step 01

Create a 256 by 256px document. First, turn on the Grid (View > Grid) and the Snap to Grid (View > Snap to Grid). Next, you’ll need a grid every 1px. Go to Edit > Preferences > Guides & Grid, enter “1″ in the “Gridline every :” box and “1″ in the “Subdivisions” box. You can also open the Info palette for a live preview with the size of your shape. Al these options will significantly increase your work speed.

Step 02

Pick the Rectangle Tool(M), create a 50 by 10px shape and fill it with R=242 G=242 B=242. Create a second shape. Make it 50px wide and 3px tall, fill it with R=51 G=51 B=51 and place it below the first shape (image #2).

Step 03

Continue with the Rectangle Tool(M) and create a 50 by 145px shape. Fill it with R=242 G=242 B=242 and place it below the shapes made in the previous step. Reselect the Rectangle Tool(M), create a 50 by 8px shape and fill it with R=51 G=51 B=51. Place this final shape below the large shape.

Step 04

Select all the shapes created so far and group them (Ctrl + G). Select this new group and go to Object > 3D > Revolve. Enter the data shown below then go to Object > Expand Appearance. Now, you need to ungroup and organize the resulting shapes. Save the shapes selected in image #2 and delete the others. Name these shapes from “1″ to “5″ as shown below.

Step 05

Grab the Rectangle Tool(M), create a 30 by 13px shape and place it as shown in the first image. Select this rectangle along with shape “4″ and click on the Minus Front button from the Pathfinder panel. Select the resulting shape and name it “4″.

Step 06

Select shape “1″ and fill it with the linear gradient shown in image #1. Reselect this shape and go to the Appearance panel. Open the flyout menu and click on Add New Fill. Select this new fill (from the Appearance panel) and use the gradient shown in the second image. Reselet this fill and lower its opacity to 60%.

Step 07

Go to Edit > Preferences > General and enter “0,5″ in the Keyboard Increment box. Create two copies of “1″ (Ctrl + C > Ctrl + F) then select the top copy and hit the up arrow (to move it 0.5px up). Reselect both copies and click on the Minus Front button from the Pathfinder panel. Fill the resulting shape with R=230 G=230 B=230 then add a second fill and use the linear gradient shown in the final image.

Step 08

Pick the Ellipse Tool(L), create a squeezed shape (60 by 0,7px), fill it with white and place like in the image below. Grab the Convert Anchor Point Tool (Shift + C) and click on the left and right anchor points (highlighted with yellow). Select the resulting shape, add the Arc effect (Effect > Warp > Arc) and lower its opacity to 70%.

Step 09

Let’s continue with shape “2″. First, fill it with R=176 G=176 B=176 then add four new fills and use the linear gradients shown below. Take a closer look at the gradients. The yellow text stands for Opacity and the white text stands for Location. Select the last fill and lower its opacity to 15%.

Step 10

Create two copies of “2″ then select the top copy and hit the up arrow (to move it 0.5px up). Reselect both copies and click on the Minus Front button from the Pathfinder panel. Fill the resulting shape with R=77 G=77 B=77.

Step 11

Select shape “3″, fill it with R=31 G=31 B=31 then add a new fill and use the linear gradient. Select the second fill and lower its opacity to 20%.

Step 12

Select shape “4″, fill it with R=176 G=176 B=176 then add a five new fills and use the linear gradients shown below. Select the fifth fill and lower its opacity to 80% then select the sixth fill and lower its opacity to 10%.

Step 13

Go to Edit > Preferences > General and enter “0,75″ in the Keyboard Increment box. Create two copies of “4″ then select the top copy and hit the right arrow twice (to move it 1,5px to the right). Reselect both copies and click on the Minus Front button from the Pathfinder panel. You should get a group of three shapes. Save the top right shape and delete the other two. Select this thin shape, go to the Appearance panel and remove five of the six fills then fill it with R=242 G=242 B=242. Create another two copies of “4″. Select the top copy and move hit the left arrow (to move it 0,75px to the left). Reselect these two copies and click on the Minus Front button from the Pathfinder panel. Again, you should get a group of three shape. Save the top left shape and remove the other two. Fill this shape with R=153 G=153 B=153 (don’t forget to remove the extra fills).

Step 14

Go to Edit > Preferences > General and enter “0,5″ in the Keyboard Increment box. Once again, create two copies of “4″. Select the top copy and hit the up arrow (to move it 0,5px up) then reselect both copies and click on the Minus Front button from the Pathfinder panel. You should get a group of three shapes. Remove the middle shape then fill the left shape with the linear gradient and the right shape with R=230 G=230 B=230.

Step 15

Select shape “5″ and fill it with R=51 G=51 B=51 then add three new fills and use the gradients shown below. Select the fourth fill and lower its opacity to 15%.

Step 16

Grab the Rectangle Tool(M) and create a simple rectangle. Fill it with black, Send it to Back (Shift + Ctrl + [) and place it as shown in the first image. Hit Shift + Ctrl + F10 to open the Transparency panel. Pick the Ellipse Tool(L) and create a squeezed shape as shown in the second image. Fill it with black, add a 7px Gaussian Blur effect and lower its opacity to 30%. Now, you need to mask this shape. Create a copy of "4", fill it with white and Bring it to Front (Shift + Ctrl + ]). Select this white shape along with the blurred circle then open the flyout menu of the Transparency panel and click on Make Opacity Mask.

Step 17

Pick the Ellipse Tool and create a 35 by 20px shape. Now, grab the Rectangle Tool(M) and create a shape above the upper half of this circle. Reselect both shapes and click on the Minus Front button from the Pathfinder panel. Fill the resulting shape with R=242 G=242 B=242. Select this half circle, add the 3D effect then go to Object > Expand Appearance. You should get two new shapes. Ungroup them.

Step 18

Select the top shape made in the previous step and fill it with the linear gradient shown in the first image. Add a new fill for this shape and use the radial gradient shown in the second image. Select this second fill and lower its opacity to 80%.

Step 19

Select the bottom shape (made in step #17) and fill it with R=133 G=133 B=133. Add three new fills for this shape and use the linear gradients shown below. Select the fourth fill and lower its opacity to 25%.

Step 20

Pick the Ellipse Tool(L), create a squeezed shape (19 by 0,3px), fill it with white and place it as shown in the image below. Grab the Convert Anchor Point Tool (Shift + C) and click on the left and right anchor points (highlighted with yellow). Select the resulting shape, add the Arc effect (Effect > Warp > Arc) then lower its opacity to 50%.

Step 21

Finally, let’s add a simple shadow effect. Pick the Ellipse Tool(L) and create a 102 by 52px shape. Send it to Back (Shift + Ctrl + [) and place it in the bottom of your icon. Fill it with black, add a 7px Gaussian Blur effect then lower its opacity to 25%.

Final

Now your work is done. Here is how it should look like.


29.9.10

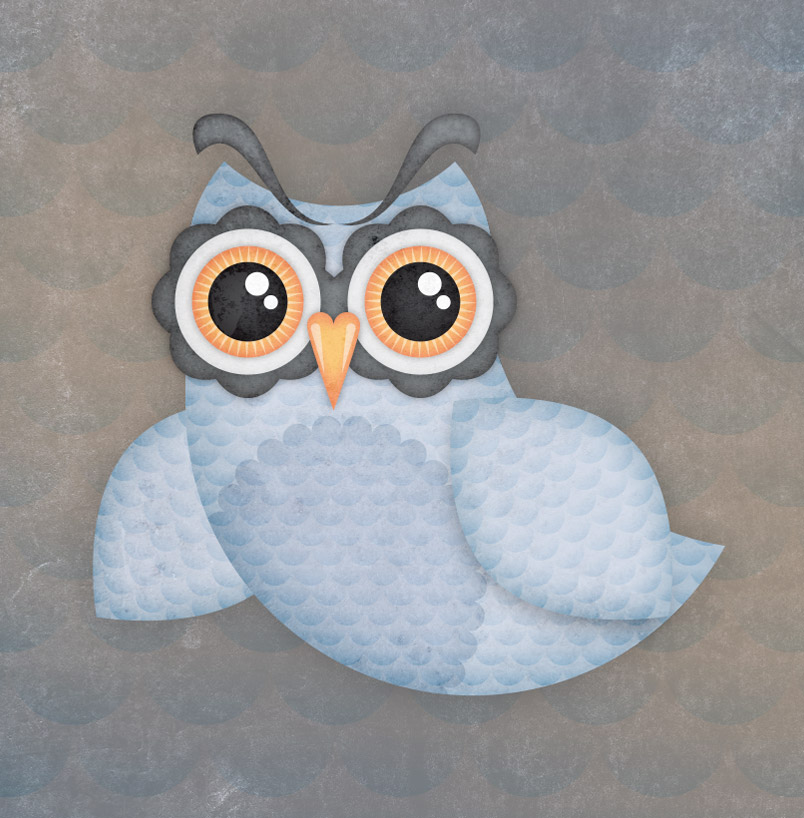
Create an Elegant Patterned Vector Owl in Illustrator

To finish off the design it’s brought into Photoshop for some grungy textures to rough up the clean vectors to give a cool tactile feel.

Open up Adobe Illustrator and draw a large circle on the artboard. Hold ALT and drag the circle to one side to make a duplicate, then use the Subtract option from the Pathfinder palette to punch out the circle from the original.

Draw a Rounded Rectangle with max corner radius (press the right cursor key) and carefully align it to the width of the crescent shape. Toggle outline mode (CMD+Y) to ensure everything lines up. Merge these two shapes with the Pathfinder palette.

Draw another circle, this time overlap it across the top edge of the owl body. Use the Subtract option from the Pathfinder to create a couple of simple ears on the head.

Elsewhere on the artboard draw a circle, then with the Convert Anchor Point tool remove the bezier handles from the upper and lower points. Use the Direct Selection Tool to drag these points upwards and downwards respectively to lengthen this shapes to produce a simple wing.

Rotate and move the wing into place on the body of the owl. Draw another circle as move into place as an eye. Use the Pucker and Bloat effect to convert the shape.

Copy the shape then paste in front (CMD+F). Hold Shift while rotating to limit the angle to 45 degrees, then go to Object > Expand Appearance to convert the effect into solid shapes then merge the two with the Pathfinder.

Add a few more circles aligned to the centre of this shape. Paste each new circle then scale it while holding Shift and Alt. Finish the eye with a couple of smaller circular highlights.

Duplicate all the shapes that make up the eye and move them to the opposite side. Merge the surrounding shapes to blend them together where the two overlap.

Create the basics of what will be the owl’s beak using three circles – Two small circles placed side by side, then a larger one at the exact with of the two smaller circles. Use the Direct Selection Tool to select and delete the upper most point from the larger circle.

Drag the lower most point downwards vertically (hold Shift) and remove the bezier curves with the Convert Anchor Point tool.

Overlap the shapes then use the Merge option from the Pathfinder to blend them together. Move the beak into place between the eyes.

Use the Pen tool while holding Shift to draw a flowing shape. Keeping the bezier curves on strict angles should help keep the curves flowing smoothly.

Move all the shapes into their final positions to create the basic structure and outline of the owl character.

Add a basic blue fill to the body of the owl, then head to Effect > Stylize > Inner Glow. Select a darker tone of blue and adjust the blur so the glow subtly flows in from the edges. Add the same fill and Glow settings to the wings.

Use similar Inner Glow styling, but this time with grey tones on the ‘eyebrows’ and shapes that surround the eyes.

To make the eyes stand out that little more, add a Drop Shadow. Adjust the options so there’s no offset and the Opacity is around 40%.

Add a grey to white radial fill to the outer circles that make up the complete eye. Move the gradient slider so the grey only creeps in slightly from the edge.

Give the next circle an orange/yellow radial fill to create a bright iris colour, and add another subtle Drop Shadow.

Elsewhere in the document draw a small circle. Drag the upper most point upwards with the Direct Selection Tool then remove the bezier curves with the Convert Anchor Point tool.

Select the Rotate Tool then Alt-Click just underneath the shape. In the subsequent options box enter 10 degrees and hit the Copy button.

Repeatedly press the shortcut CMD+D to generate a complete circle of radial shapes. Remove the black stroke and group them all together (CMD+G).

Move the radial shapes into place over the iris. Use the shortcut CMD+[ to alter the stacking order so it sits under the pupil of the eye.

Finish off the eye with a black to grey gradient on the pupil and leave the highlights with just a white fill. Use the same colours from iris to colour the beak with a fill and Inner Glow. Don’t forget a good old Drop Shadow to list the objects from the screen.

Draw another small circle elsewhere on the artboard. Delete the upper most point to leave a semi-circle. Give this semi-circle a vertical gradient fill from the darker blue tone used on the body to transparent.

Hold ALT and Shift while dragging the shape to one side to align multiple circles side by side, then select and drag this row downwards to duplicate a series of further rows.

Align a guide to the centre of the first circle, then move the second row until the edge of the circles aligns with this guide. Repeat the movement on each alternating row using the shortcut CMD+D then group them all together.

Use three more guides to carefully outline a repeating area within the series of rows. Zoom right in to ensure the guides sit perfectly against the centre points and outlines of the circles. Draw a blank square inside these guides.

Select both the group of circles and the blank square and click the Crop option from the bottom row of the Pathfinder to trim the pattern down to size. Drag this graphic into the Swatches palette.

Copy the main body shape and press CMD+F to paste it in front. Delete the Inner Glow from the appearances palette then replace the fill with the newly created pattern swatch. Change the blending mode to Color Burn.

Repeat the process on the wings, but also go to Object > Transform > Rotate. Select just the Patterns checkbox and enter 30 degrees into the Angle to rotate the pattern to match the orientation of the wing.

Make another duplicate of the wing and give it a black fill. Use a large temporary circle with the Pathfinder to clip the shape down.

Add a large Gaussian Blur (Effect > Blur > Gaussian Blur) of around 40px.

Press CMD-[ to send the black shape underneath the main wing, then rotate it slightly so the blur creeps out slightly further from the lower edge. Change the blending mode to Multiply at 30%.

Draw a large oval over the chest area of the owl. Adjust the Stroke options to 30pt Weight with Round Cap and Bevel Join, check the Dashed Line option and change the dash to 0 and gap to match the stroke weight of 30pt.

Go to Object > Expand and select just the Stroke option to convert the stroke into basic shapes. Right click and Ungroup, then merge everything together with the Pathfinder.

Use a duplicate of the main body shape as a tool along with the Intersect option from the Pathfinder to trim the chest shape down to size.

Give it a basic blue fill then set it to Multiply at 40%.

To finish off the design with some rough textures, paste it into a large Photoshop document with a grey background.

Paste a copy of the body pattern fill from Illustrator and scale it up to fill the whole document. Set this to Color Burn, then add a rough texture and set it to Color Dodge at 80%.

Import another texture file then load the selection of the owl illustration by clicking the layer thumbnail while holding the CMD key. Inverse the selection (CMD+Shift+I) then clear out the excess.

Set this new texture overlay to Color Burn at 70% opacity to finish off the illustration with some dirty distressed marks.
Vector owl illustration
There we have one complete owl illustration.