 9:07:00 AM
 tutorial_mania
Stage 4: Create Kerbs
Introduction
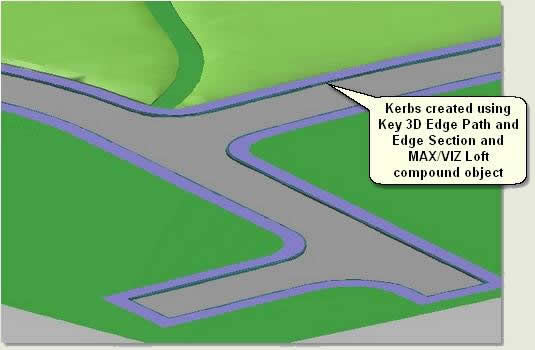
In general an edge is created where one surface meets another. An edge could be a surface level edge, a kerb, a retaining wall, steps or terrace. Edges are often created using the Loft compound object instead of a simple extrusion to take advantage of the loft mapping parameters. The Loft mapping parameters enable kerb or brick materials to follow the curves of an edge as they do in the real worldIn this example a kerb is created using Key 3D Edge Path and Key 3D Edge Section
Download Sample Data
In order to follow this tutorial, you may want to use the supplied files. Please read the sample data instructions before downloading.AutoCAD Drawing files: dwg_files.zip (784kb)
3ds Max Scene files: scene_files (7.8mb)
4.1 Create a path for the kerb
- Carry on from the previous scene or open ACAD to 3D Stage 3b.max
- Select Surface_ B_Road and Isolate Selection
- Open Key 3D Edge Section and press Create Edge
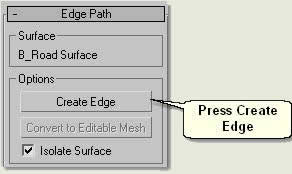
- When the Create Edge dialog pops up select (as always) Linear and type Kerb Path in the Curve Name text box


Select Surface_B_Road again and move the surface down on the Z axis -0.15


4.2 Create a kerb loft
- Open Key 3D Edge Section dialog

- Press Browse and select Section Kerb 01
- Press Drop and in the Top viewport place the Section at the top left of the site

NOTE: Placing all sections for lofts or other shapes for bevel profiles etc at the top left of the site, away from the site geometry, is a good habit. Sections and profiles are then available in an easy to access place for re-use at any time
- Make the display type Wireframe. This helps when optimising the loft path and shape steps
- Select Kerb Path and open Key 3D Edging dropdown > Loft
- On the Skin Parameters rollout change the Shape Steps to 0 and the Path Steps to 0

- On the Creation Method rollout press Get Shape.


- On the Skin Parameters rollout increase the Shape Steps and Path Steps to see if they alter the smoothness of the kerb. In this instance it does not, so leave the settings as they are at 0
- Rename the loft Loft Kerb
- Right click over the loft and select Properties. The kerb loft should have about 7000 to 8000 faces. This is acceptable as the loft is the only loft in the scene and is a main feature.
NOTE: To change other parameters on the loft such as the orientation (the loft sometimes is inverted) or the position of the loft on the path Ref: Key Fundamentals / Working with Objects
 Posted in
AUTO CAD
Posted in
AUTO CAD


0 comments:
Post a Comment