Translation

Showing posts with label Freehand. Show all posts

10.8.10

Creating "Hollow" Envelopes Using custom Envelopes to mimic a brush stroke


1) We're going to start off with a fairly simple shape to just show you the concept. Basically a starting point for you to take and make your very own envelopes later.
Draw a Pentagon shape like shown above using thePolygon tool. Give the stroke about a 20 pt. width and apply a lightly tinted color to it.
This represents the thickness of the final envelope. If you want to try something thicker or thinner, adjust the stroke width.

2) While the shape is selected, go under the Modify menu -> Alter Path -> Expand Stroke, or hit the toolbar button.
Enter in the width of the stroke if it's not already there, here we use 20.

3) Now either Lock this shape or put it on a separate layer under the Foreground layer and lock that layer. This will be used as a guide for the Hollow Envelope we are about to create.

4) Next, draw a rectangle about as tall as the shape and Ungroup it.
Now we'll be adding some extra points to this rectangle to use later, but first we need to find out how many points to add.

5) If we go back to the pentagon shape and select the paths, we can see that it contains 10 points total. So we take take that value and add 2 more points for a total of12 points. This is the amount of points we want to have in the rectangle to work with.

6) Use either the Bezigon or Pen tools to add the points to the longest sides of the rectangle until you see in the Object Inspector, that it has 12 points.
It is very important to add the same number of points to either side of the rectangle like shown above.

7) Next draw any shape about as tall as the rectangle. Above I just drew a thin Ellipse. This is what we'll be applying the envelope to temporarily.
To get you through the next steps, it may be helpful to give this ellipse a Lens fill so that it's semitransparent.
Now select the rectangle we created, and Cut or Copyit into the clipboard.

8) Select the Ellipse and in the Envelope Toolbar, hit the Paste as Envelope button to apply the new envelope.
Now we're ready to get started, but first I'm going to try to explain the next steps, and I hope it's not too confusing for you.

What you'll be doing is moving the points of the Envelope to correspond with the points of the pentagon shape.
The points highlighted in Green will be snapped to theoutside points of the pentagon, while the ones highlighted in Orange will be snapped to the inside.
Got it? I certainly hope so... heh heh.

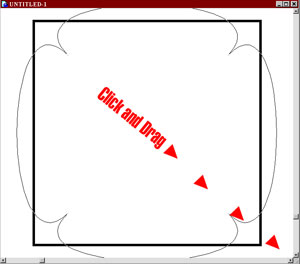
9) First turn on Snap to Points under the View menu if it isn't already.
Start with the top two points of the Envelope and snap them to their corresponding points on the polygon. You can pick any points to start from on the polygon. Look at the animation above to see it in action.

10) Now continue the process with the remaining points. Making sure that the inside points of the envelope snap to the inside points of the polygon shape and the outside points of the envelope snap to the outside of the polygon.
Watch the animation above to see me finish off my envelope. Yes it can get pretty confusing at first, but it definitely helps if you've used a Lens filled shape so you can see the underlying polygon points.
When you get to the bottom points of the envelope, just snap them to the original top points where you started.
When you are finished, it's safe to hide or remove the original polygon.
Special Note
For shapes with curves in them, first place all the envelope points where they should go.
Click on the point first, then press and hold theOption (Alt) key. Then just click-drag curve handles from the envelope points to match the curve underneath like shown in the animation at left.

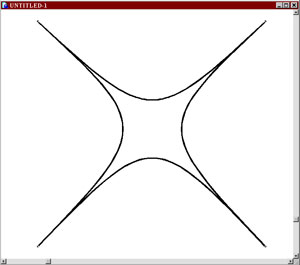
To test and see if the Envelope was created correctly, hit the Show Map button on the Envelope Toolbar. You should see that the Envelope is warping around the inside of the polygon shape like shown above.

11) Now it's time to finish and add this to FreeHand as an Envelope preset.
While the envelope is still selected, go under the Xtras menu -> Distort -> Add Points or use the toolbar button shown above.
This adds more points to the Envelope and you'll immediately notice that it warps the shape much more accurately. You can add as many points as you feel necessary for your envelopes.

12) Once you've added points to the Envelope and are happy with it's appearance, keep it selected and hit the Save as Preset button. Then name it.
Congratulations! You have now created a Hollow Envelope and it's been saved in FreeHand ready to be reused.

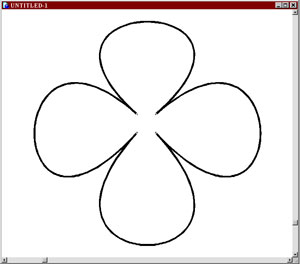
Now apply it to something more interesting. Above I created a neat looking brush stroke that is actually a blend of two shapes.
Once the Envelope is applied, you'll notice that it may be squashed, so just use the Transform Handles to adjust this. Once finished, it definitely has the appearance of a natural brush stroke!
Special Note
Sometimes it may be necessary to add points to the shapes before applying the Envelope to them to get more accurate results. Just select the shape and go under the Xtras menu -> Distort -> Add Points or use the toolbar button.


Quick shapes in FreeHand


For this tutorial we are going to explore the handy "Bend" tool. Using it you can quickly make shapes that will have people asking "How did you do that?"
I usually use "inches" as my measurement in this program, however at times I will change to "pixels" for more precise measurment.
Lets get started.
 Create a 2" by 2" square with the rectangle box tool. [Command+U] (control+U -windows) to "ungroup" the square, and make it a path with 4 editable "nodes" or "anchor points".
Now to create a clover shape really quickly, Select the square then, simply go to:
> Window >Xtras >Xtra Tools or [Command+option+X] (control+alt+X -windows) to bring up the "Xtra tools pallet" the very bottom button is the "Bend" tool. Click on the "Bend" tool and then click in the center of your square and drag down and to the right while holding the mouse button down. (down and to the left will also work) The further you can drag "down and to the right", the more the the corners of the original square will travel inward toward where you started your drag.
There is my clover, in just seconds. Now if I were going to actually use it as a clover I would rotate it about 20 degrees and fill it with a gradient or two. Then off to photoshop to airbrush a little detail into it.
If you go "up and to the left" while dragging you will create a star type shape. Try the "Bend" tool on differnet path shapes and see what you come up with. Add a bunch of random nodes to the square path and and try this method.


23.7.10

tips and triks pen tool

This tutorial is for applications that use the pen: Adobe® Photoshop®, Adobe Illustrator® and Macromedia® FreeHand®. When drawing with the pen you will inevitably have to stop mid-path and make adjustments to anchor points, control handles or line segments.
postit.gif   Note: Different software packages use different terms for the same things, and since this article is using mixed terminology please consult the table of equivalent terminology for clarification of terms.
Usually, when first learning the software, the novice will go to the tool palette to switch back and forth between the pen and other tools. This is very time consuming and there are provisions in the software to switch tools without having to select them from the tool palette. The keys on both the right-hand and left-hand sides of the spacebar are used for this purpose. Shown below are the keyboard hand positions for a right-handed mouse:
Left hand keys - Windows®

Left hand keys - Macintosh®
Shift       =
Alt       =
Ctrl       =
        Shift
        Option
        Command

keyswin.gif keysmac.gif
handkeys.gif

The diagram above shows the hand positions (for a right handed mouse) to take advantage of keyboard shortcuts for drawing with the pen. This is the quickest way to use the pen.

Mac® users will use various combinations of the Shift, Option and Command keys, while Windows users will use parallel combinations of the Shift, Ctrl and Alt keys.

For example, while actively drawing a path with the pen tool, Windows Illustrator users can press the Ctrl key to switch between the pen and the selection tool while at the same time press the Shift key to constrain a line to 45° increments. When finished making the adjustment, the user simply releases the keys and resumes drawing with the pen tool - all without resorting to the tool palette.

Following this tutorial are step by step examples to drill the point.
The idea behind the keyboard shortcuts in Adobe® Illustrator®, Adobe Photoshop® and Macromedia® FreeHand® is so you can draw paths in a fluid manner with as few interruptions as possible. Ideally, you would draw as fluidly as if you were actually using a pen or pencil. The previous page described the hand positions with the keyboard and mouse. This page describes how it is done. The next page gives you practice templates for each application.

While the pen tool is selected and you are actively drawing a path, pressing the following keys will bring up a different tool:

For Adobe Illustrator or Adobe Photoshop:
Macintosh® Windows® Function
Command
Option
Shift
Ctrl
Alt
Shift
Selects the last selection tool
Selects the Convert Direction Point Tool
Constrains angle to 45° increments
For Macromedia FreeHand:
Macintosh Windows Function
Command
Option
Shift
Ctrl
Alt
Shift
Selects the Pointer Tool
Places a corner point
Constrains angle to 45° increments

Basically the functions of these keys between the Adobe applications and Macromedia FreeHand are the same. There is only a slight difference in the use of the Alt or Option key to create a corner point. In Illustrator and Photoshop, all newly placed points with control handles are smooth points by default. The Convert Direction Point Tool is used to change a smooth point to a corner point with handles. In FreeHand, you can drag out control handles for a corner point when you first place it. Brief Example - Adobe Illustrator
In the following example, three tools are used without returning to the tool palette to change tools:
1. Drag out the first point
clover1a.gif

 
2. Drag out the second point. The first curve is off, now. clover2a.gif

 
3. Press Ctrl (Windows) or Command (Macintosh) and use the Direct Selection Tool to drag back the first curve. clover3a.gif

 
4. Press Alt (Windows) or Option (Macintosh) to bring up the Convert Direction Point Tool and drag the second point's handle (changing it from a smooth point to a corner point) to redirect the next curve. clover4a.gif

 
5. Place the next point and continue drawing the path. clover5a.gif

Pen Cursors

The pen cursor helps you identify where you're at when drawing paths. You need to know when you are over a point so you can append to an open path (restarting the path) or when you are over a point so you can close a path. You also need to know what the cursor looks like to start a new path so you don't inadvertently keep adding to an existing path or vice versa. These are the most important cursors. Their functions are identical between Adobe Illustrator 7 and 8, Adobe Photoshop 5 and Macromedia FreeHand 8. The chart below describes these cursors.

  Start
New
Path

Continue
Adding
To Path

Restart
Open
Path

Close
Path


Illustrator 7 / 8 cursai1.gif cursai2.gif cursai3.gif cursai4.gif


Photoshop 5 curspsd1.gif curspsd2.gif curspsd3.gif curspsd4.gif


FreeHand 8 cursfh81.gif cursfh82.gif cursfh83.gif cursfh84.gif


Drawing Technique make building

1. Create a new document and click View > Snap To Point. This setting plays an important role in this technique. Next, select the Rectangle tool in the Toolbox.
2. Draw a rectangle in the workspace.
3. Click Window > Panels > Transform to bring up the Transform panel. Click the "Skew" button (below left) then enter "15" in the box with a "v:" next to it under "Skew angles:". The "V" is for "vertical". Click "Apply" to apply to transform the rectangle (below right).


4. Select the Rectangle tool again and draw another rectangle to the left of the first one similar to the example below.
5. Use the Transform panel to give this rectangle a vertical skew of minus 25 degrees. Click "Apply" to transform the rectangle.

6. Position the mouse pointer near the lower right corner of the left rectangle. When you see a small solid square next to the pointer, press and hold the mouse button down then drag the object until it snaps to the lower left corner point of the rectangle on the right.
7. Position the mouse pointer over the upper left corner point of the left triangle (below left). When you see the pointer with the solid square next to it, click and drag this corner point to adjust the rectangle to the desired width (below right).
8. Once the desired width is attained, position the mouse pointer over the opposite point (below left). Click and drag this point downwards until it snaps to the corner point of the rectangle on the right (below right).
9. Two of the rectangles are now complete. Next, you'll be adding the top rectangle.

10. Use the Rectangle tool and create a new rectangle just above the first two (below left), Release the mouse button and this new rectangle will be selected (below right).
11. Again, using the Transform panel, enter "-50" in the horizontal box and a zero in the vertical box under the "Skew angles:" section. Click "Apply" to skew the rectangle.
12. Press the "Rotate" button on the Transform panel.
13. Enter "15" for the rotation angle and click "Apply".
postit.gif   Note: You can calculate the amount of skew and rotation for the top rectangle. The -50° of skew is the result of 90 minus 25 (for the amount of vertical skew on the left rectangle) minus 15 (for the amount of vertical skew of the right rectangle). The 15° of rotation is the same as the amount of skew on the right rectangle. You can vary these amounts to achieve different effects.
14. Click away to deselect the top rectangle, then drag it downwards by the lower corner point until it snaps to the corner point of the first two rectangles as shown below.
15. Position the mouse pointer over the far right corner point of the top rectangle until you see the small square next to the pointer.

16. Click and drag this point until it snaps to the upper right corner point of the rectangle below.
17. Position the mouse pointer over the far left corner point of the top rectangle until you see the small square next to the pointer.

18. Click and drag this point until it snaps to the corner point of the lower right rectangle.
19. The box is finished. You can always vary the angles to achieve a true isometric angle (30 degrees for the left and right rectangles) or experiment with them for the desired effect. In the following steps, you'll see how to use this same box as a basis for creating a number of boxes with the same orientation.


Reshaping The Basic Box
postit.gif   Note: Copy the box made in the previous steps if you want to save it. Click Edit > Select All followed by Edit > Clone, then drag it away from the first one.
20. As shown in a previous step, position the mouse pointer over the corner point of one of the rectangles until you can see the small square next to the pointer (below left). Click and drag it to reshape the rectangle (below right).
21. Repeat the above steps for the left rectangle until the desired width is attained...
22. Click and drag the lower point until it snaps to the corner point of the right rectangle.
23. Next click and drag the upper right corner point of the top rectangle until it snaps to the rectangle below right.
24. Repeat the above steps on the opposite corner point of the top rectangle until it snaps to the lower left rectangle.
25. Now you have a new box with the same orientation as the first.

26. Here is an example of a composition made using the previous steps...

27. And here is another example. As you can see by the keyline view on the right, this drawing is simply a collection of cloned rectangles.