 8:00:00 PM
 tutorial_mania
This tutorial is for applications that use the pen: Adobe® Photoshop®, Adobe Illustrator® and Macromedia® FreeHand®. When drawing with the pen you will inevitably have to stop mid-path and make adjustments to anchor points, control handles or line segments.
| Note: Different software packages use different terms for the same things, and since this article is using mixed terminology please consult the table of equivalent terminology for clarification of terms. |
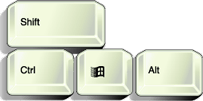
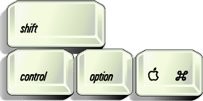
| Left hand keys - Windows® | Left hand keys - Macintosh® |
| Shift = Alt = Ctrl = | Shift Option Command |
 |  |
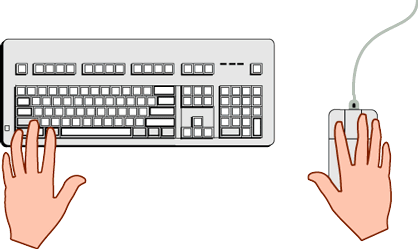 | |
The diagram above shows the hand positions (for a right handed mouse) to take advantage of keyboard shortcuts for drawing with the pen. This is the quickest way to use the pen.
Mac® users will use various combinations of the Shift, Option and Command keys, while Windows users will use parallel combinations of the Shift, Ctrl and Alt keys.
For example, while actively drawing a path with the pen tool, Windows Illustrator users can press the Ctrl key to switch between the pen and the selection tool while at the same time press the Shift key to constrain a line to 45° increments. When finished making the adjustment, the user simply releases the keys and resumes drawing with the pen tool - all without resorting to the tool palette.
Following this tutorial are step by step examples to drill the point.
The idea behind the keyboard shortcuts in Adobe® Illustrator®, Adobe Photoshop® and Macromedia® FreeHand® is so you can draw paths in a fluid manner with as few interruptions as possible. Ideally, you would draw as fluidly as if you were actually using a pen or pencil. The previous page described the hand positions with the keyboard and mouse. This page describes how it is done. The next page gives you practice templates for each application.
While the pen tool is selected and you are actively drawing a path, pressing the following keys will bring up a different tool:
For Adobe Illustrator or Adobe Photoshop:
| Macintosh® | Windows® | Function |
| Command Option Shift | Ctrl Alt Shift | Selects the last selection tool Selects the Convert Direction Point Tool Constrains angle to 45° increments |
| Macintosh | Windows | Function |
| Command Option Shift | Ctrl Alt Shift | Selects the Pointer Tool Places a corner point Constrains angle to 45° increments |
Basically the functions of these keys between the Adobe applications and Macromedia FreeHand are the same. There is only a slight difference in the use of the Alt or Option key to create a corner point. In Illustrator and Photoshop, all newly placed points with control handles are smooth points by default. The Convert Direction Point Tool is used to change a smooth point to a corner point with handles. In FreeHand, you can drag out control handles for a corner point when you first place it. Brief Example - Adobe Illustrator
In the following example, three tools are used without returning to the tool palette to change tools:
| 1. Drag out the first point |  |
| 2. Drag out the second point. The first curve is off, now. | 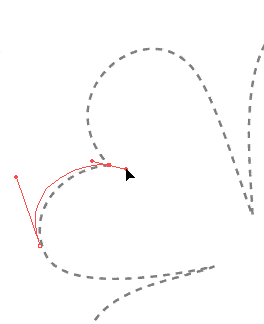 |
| 3. Press Ctrl (Windows) or Command (Macintosh) and use the Direct Selection Tool to drag back the first curve. | 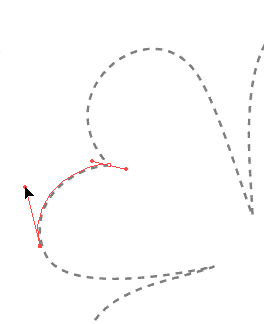 |
| 4. Press Alt (Windows) or Option (Macintosh) to bring up the Convert Direction Point Tool and drag the second point's handle (changing it from a smooth point to a corner point) to redirect the next curve. | 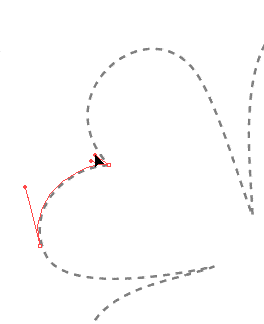 |
| 5. Place the next point and continue drawing the path. | 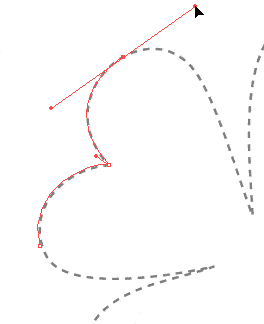 |
Pen Cursors
The pen cursor helps you identify where you're at when drawing paths. You need to know when you are over a point so you can append to an open path (restarting the path) or when you are over a point so you can close a path. You also need to know what the cursor looks like to start a new path so you don't inadvertently keep adding to an existing path or vice versa. These are the most important cursors. Their functions are identical between Adobe Illustrator 7 and 8, Adobe Photoshop 5 and Macromedia FreeHand 8. The chart below describes these cursors.
| Start New Path | Continue Adding To Path | Restart Open Path | Close Path | |
| Illustrator 7 / 8 | ||||
| Photoshop 5 | ||||
| FreeHand 8 |
 Posted in
Freehand
Posted in
Freehand


0 comments:
Post a Comment