Step 1: Selecting The Victorian Man
We’ll start by cutting this
man from his background. For this type of selection, I prefer to use the manual way, path. From paths panel create new path then using pen tool draw path around the man. As you can see i don’t care much about his face because we will remove it later.
Step 2
Once we’re done creating path, hit ctrl+Enter to change it to a selection. Press ctrl+Jto duplicate the selection to a new layer. You can also do this by selecting menu Layer > New > Layer via Copy. To help focus on the man, hide Background by clicking its eye icon.
Step 3: Removing Face
To remove his face we can just use an eraser.
Step 4: Fixing Floating Hat
Now, we need to create his bottom hat. To do this we must draw manually using clone tool. Activate clone tool and check Sample All Layers. This option allow us to clone on a separate layer and keep the original picture safe. Then create a new layer. With clone tool sample a similar color from his hat by alt+click it.
Step 5
With clone tool, draw his bottom hat. This might take a while, I spend 10-15 minutes for this. To keep it natural I suggest you to use different clone source every time you click.
Step 6
Using lasso tool, create ellipse selection underneath his hat and fill it with black.
Step 7
Add Gaussian Blur (Filter > Blur > Gaussian Blur) to give it a soft realistic shadow.
Step 8: Fixing Collar
We need to manually draw his back collar. The step is a bit similar to what we do when creating bottom part of his hat. Create a selection in collar shape, sample color from his front collar, then draw it directly with brush tool. To avoid flat color we must use many color source from his front collar.
Step 9
Draw shadow inside his collar and add another Gaussian Blur.
Step 10: Import Man Without Face To New Background.
Now we’re done with this man. Select all (
ctrl+A), click Edit > Copy Merged (
ctrl+shift+C). In our new
background paste the man (
ctrl+V) and resize it (
ctrl+T). See image below for reference.
Step 11: Dodge and Burn
We still need to fix lighting on the man. To do this, we will use non-destructive burning and dodging. First, alt+click New Layer icon. In the dialog box select Use Previous, Mode: Overlay, and Fill with Overlay.
Step 12
See picture below! The light source is behind the man so his back must be lighter than his front. To fix this, paint with burn tool to make it darker and dodge tool to make it lighter.
Here’s what we see if the layer is in Normal blend mode.
Step 13: Add Shadow
Off course this man must have shadow. We know that the light source is behind him, so the shadow must be in front of him. Duplicate the man layer and hit ctrl+T. Hold ctrl and move its corner until it lies on the ground.
Step 14
We don’t want to see his twin lying on the ground right? We want his shadow.
So, here’s the trick. Hit D, this will change foreground color to black. Then hitshift+alt+delete, this will fill layer with foreground color (in our case, black).
Step 15
We still need to focus on the detail. As you can see below, cane’s shadow moves a little and there’s a hole between his feet. I fix this by doing minor transformation and painting with black.
Step 16
Add Gaussian blur to create a soft realistic shadow.
Step 17
Farthest shadow need to be more blurry. So, select those part, soften the selection with Feather (Select > Modify > Feather), and another Gaussian Blur. Here’s a tip: because we’ve just perform a Gaussian Blur we can just hit ctrl+F to repeat it again. If you want to use different radius use ctrl+alt+F.
Step 18
Add layer mask and add black to white linear gradient to make the shadow fades away.
Step 19: Add Water Tower
Selecting the water tower with path is not a good idea. You’ll get frustrated doing it. The easiest and smartest way is using color information in channel. Our image is in RGB, that’s Red, Green, and Blue. The water tower stands in front of a clear blue sky. So, the sky will be very visible in Blue channel. Now, I want you to duplicate Blue Channel by dragging it to the new channel icon.
Step 20
Add Levels (ctrl+L) with this setting.
You can see that the sky has magically disappear. Try that with pen tool!
Step 21
Some part of the water tower is turning white. We can fix it easily by painting it with black.
Step 22
Here’s the basic principle of masking: “White reveals, Black conceals.” We want to select the water tower, not the sky. So, the sky has to be black and the water tower has to be white. Wait! Our image is completely wrong. That’s easy, just hit
ctrl+I to invert it.

Step 23
Ctrl+click blue copy channel to convert it to a selection. Copy the image and paste it behind our faceless man.
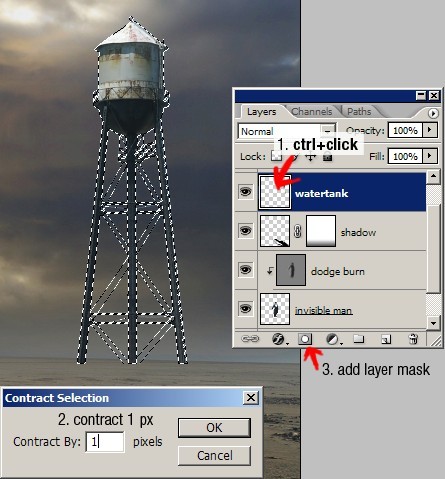
Step 24
You might notice that the there’s a small part of the sky in the water tower. Here’s one easy way to fix it. Ctrl+click water tank layer. Contract selection by 1 px (Select > Modify > Contract). Click add layer mask icon.
Here’s the result.
Step 25
Fix the lighting with non-destructive dodging and burning. We have done this in step 11.
Step 26: Adding Depth of Field
It’s time add depth to this image. Cut one of the hat collection from
old top hat set. Paste it and place it near the edge of the canvas. Hit
ctrl+T and rotate it to give a more dynamic movement.
Step 27
Give it a Gaussian Blur. Because this hat is near us, we’ll give it a big radius.
Step 28
Add another hat and give each different radius depends on its position.
Step 29: Add shadow
Dont forget to give shadow to the water tower. The step here is similar to what we did when creating the man’s shadow. Duplicate water tower layer, fill it with black, transformation, add Gaussian blur, and fading it with gradient mask layer.
Step 30
Again, don’t forget to add shadow for those hats.
Step 31: Final Adjustment
I want to add more blue to the sky. For this, I add adjustment layer Channel Mixer on top of all layers with these settings.
Step 32
Paint everything with black except the bright sky in top right. Now, only that part is affected by the Channel Mixer.
Step 33
To add more contrast add adjustment layer Levels with this setting.
Step 34
Paint everything with black except the faceless man.
Step 35
Finally, I want to make this picture warmer. Add an adjustment Layer Photo Filter with Warming Filter (85), Density 25%.
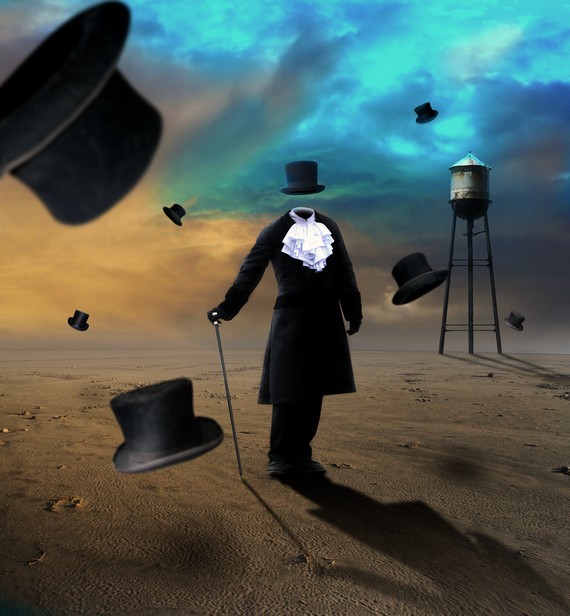
Conclusions
And here’s what we have now. I hope you like the final effect. If you have better tips about the technique used here I’d love to hear it.
 9:24:00 PM
 tutorial_mania


 Posted in
Photoshop
Posted in
Photoshop


0 comments:
Post a Comment