Step 1: Creating the Pill Shape
- Select either the the Rounded or Regular Rectangle Tools
- Create a pill shape with a Roundness of 100. ( For assistance creating a rounded rectangle, click here)
- Set the Fill to a color you want the pill effect to be. In this example, we're using a light orange, #FF9900.
- Reduce the Opacity to 88%.
- Duplicate the Pill Shape (Edit>Duplicate is one way to duplicate the shape)
Step 2: Applying the Gradients
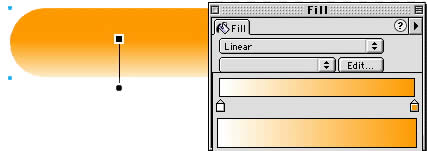
- Select the first Pill Shape and apply a Linear Gradient to it.
- Edit the gradient so one end is the color of the gradient is a lighter color of the original pill shape color.
- Modify the gradient by dragging the handles as in the diagram below. For additional assistance with modifying gradients, click here.
Step 3: Modifying the Second Pill Shape
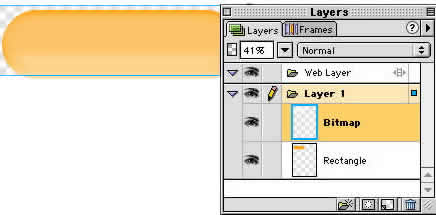
- Select the other pill shape and set the fill to white.
- Apply a Gaussian Blur to the shape by going up to Xtras>Blur>Gaussian Blur...At this point FW will tell you it needs to convert the shape to a Bitmap. Click OK. I used a setting of 5 for the Gaussian Blur but this value is flexible.
- Move the shape you just blurred on top of the original shape.
- Set the Opacity to around 40%.
Step 4: Creating the Top Reflection
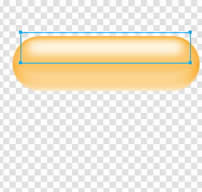
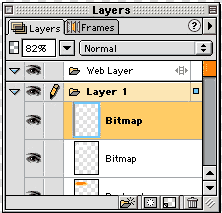
- Select the Rounded or Regular Rectangle Tool and draw a smaller, thinner rectangle over the top area of the pill shape.
- Set the Fill to White.
- Apply a Gaussian Blur with a setting of 4
- Reduce the Opacity to 82%.
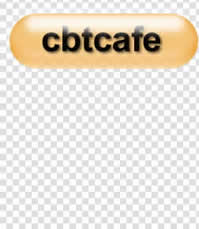
Step 5: Adding the Text
- Type out some text for the button.
- Add a Drop Shadow to the text (Effects Panel: Shadow and Glow>Drop Shadow)
- Move the text below the top Bitmap shape (this is the white shape created in Step 4)
- Center the text. The top of the text should be slightly covered by the top reflection shape you created
If the top reflection isn't covering any of the text, click it to select it and select the
Scale Tool and resize it a little so it is large enough to drop over the text.
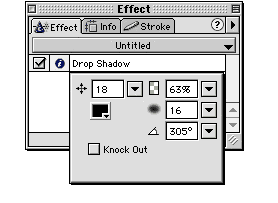
Step 6: Applying the Final Touches
- Select the bottom Pill Shape. This is the shape with the Linear Gradient applied to it. It should be the bottom object on your Layer (or the bottom Layer if you placed each object on its own layer)
- Apply a Drop Shadow to the shape. Below are the settings I used:
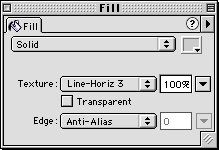
Step 7: Adding the Background
- Create a New Layer.
- Select the Rectangle Tool and draw a rectangle over your canvas.
- Apply a Fill color of light gray.
- Set the Texture to Line Horizontal-3 and set the Amount to 100%.
 12:58:00 PM
 tutorial_mania


 Posted in
Fireworks
Posted in
Fireworks


0 comments:
Post a Comment